It’s been a few stressful weeks, but I finally found the time to write another blog post. And today I even have a juicy one, I dare to say.
In this blog post, I’m going to create a Power Automate Flow with the HTTP Request Trigger (premium) which can be triggered within a Power Apps App that doesn’t need any premium licenses.
That’s correct… “Make custom connectors free with Dataverse for Teams”. Quite a strong statement, don’t you think? But it’s true… and Microsoft even supports that! The keyword is “Azure API Management“.
If you’ve never heard of it and are in need of a lot of custom connectors, your world will change rapidly (for the better, if I wasn’t clear 😉). With Azure API Management you can create your own API’s, set subscriptions, limit calls, do routings and so much more. It will also mask all API’s with your own URL. Say, you have an existing API that points to the following URL:
https://mi5.com/If you go ahead and create an Azure API Management with the name MI5, you’ll get something like:
https://mi5.azure-api.netThat is going to be your base URL in Azure. But more to that later, as it probably already sounds a bit confusing, except that it really isn’t. Just hear me out.
Create a Flow
In this tutorial, we’re going to start a Power Automate Flow that has the When an HTTP request is received trigger. If you don’t know already, it is a premium trigger. Before you do that though, create a new Dataverse for Teams table (we can use it later for our demo purpose).
After that, simply go to https://flow.microsoft.com, click on My flows, click on New flow, and select Instant cloud flow. Skip the next screen.

Once you are in the flow, search for the trigger When an HTTP request is received.

Say, we would like to trigger the flow as soon as a new item has been created in one of our Dataverse for Teams tables. Sure, we could use the When a row is added, modified or deleted trigger, but the flow will then not be executed instantly. Worst case you’d need to wait 5mins or even more!
Especially in Power Apps, we would like to give feedback in real-time. You can’t expect the user to wait for an answer for 5mins. While it might work in some cases, it won’t in ours. That is why you can copy and paste the following JSON to the Body of the trigger:
{
    "type": "object",
    "properties": {
        "dataverseGuid": {
            "type": "string"
        }
    }
}
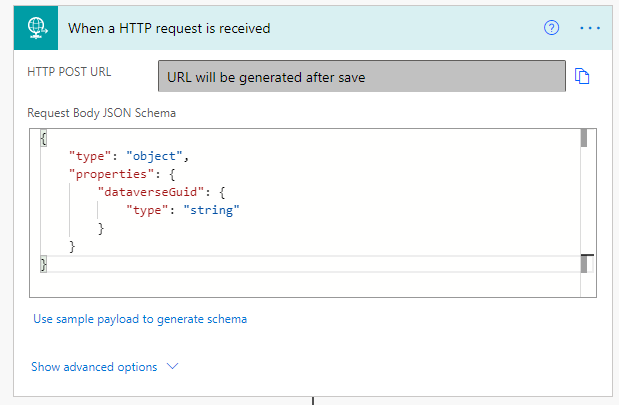
Next, add a new action called Get a row by ID, and choose the right Table in the Table name. For the Row ID select the dataverseGuid that we created in the previous step.
Give the flow a name and save it. Once the flow is saved, open the When a HTTP request is received trigger again to get the HTTP POST URL. Copy the value to your clipboard.
And we’re already done with the flow part. This is how your whole flow should look like.

Let’s head over to Azure API Management.
Create Azure API Management
Head over to https://portal.azure.com and search for Azure API Management services. Click on Create and type in the fields in the Basic tab information. If you like you can check out all the other tabs as well, but for our little project, you can just leave them on default.
Now, this is important: In order for it to be FREE, you have to choose the Consumption TIER under Pricing tier. The consumption tier allows you to handle 1mio calls per month for free, and each other million is – as of today – $3.50.
Of course, if you have more than 1mio calls per month, it won’t be completely free anymore, but I dare to say that you probably won’t get there. If you should get there, some other pricing tiers might be better suited for you.
This might take a while. Once its done you can go ahead and add your own API.
Add your own API
With the Azure API Management resource provisioned, you can click on APIs on the left navigation, click on Add API and select Blank API.
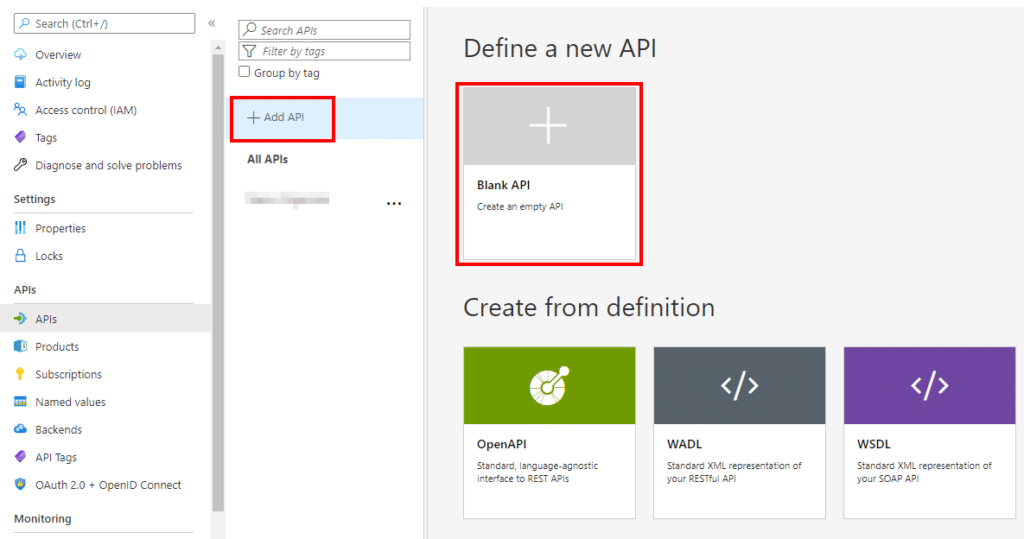
Define a display name, such as Start My Flow, and paste the Flow URL that you copied in the previous Create a Flow step to the Web service URL field.
Click Create.

Add an operation
Once you created your API, you’ll need to create operations. To add one, simply make sure to have your API selected and then click on Add operation.

Type in a Display name (e.g. TriggerMyAPI) and make sure it’s a POST type. Since we’re using the root URL of the recently created API, type in a Slash (/) after POST.
All that’s left to do is to make sure that a parameter is required when calling our API. For that, below the fields that we just filled out, click on the Request header and click on Add representation.
Type in/select application/json. In the SAMPLE field type in the following:
{"dataverseGuid": "16830e96-a1da-4452-98c9-d61e5ca9b420"}…and in the DEFINITION field click on New Definition and set the Definition name to Dataverse GUID. Click on Create definition.
This is how it should look like once you’re done:

One more thing before we save: We want to make sure we get a confirmation in case our call was successful. For that, click on the Responses tab, click on Add response, and select 200 OK.
Finally, click on Save.
This is what you should end up with:
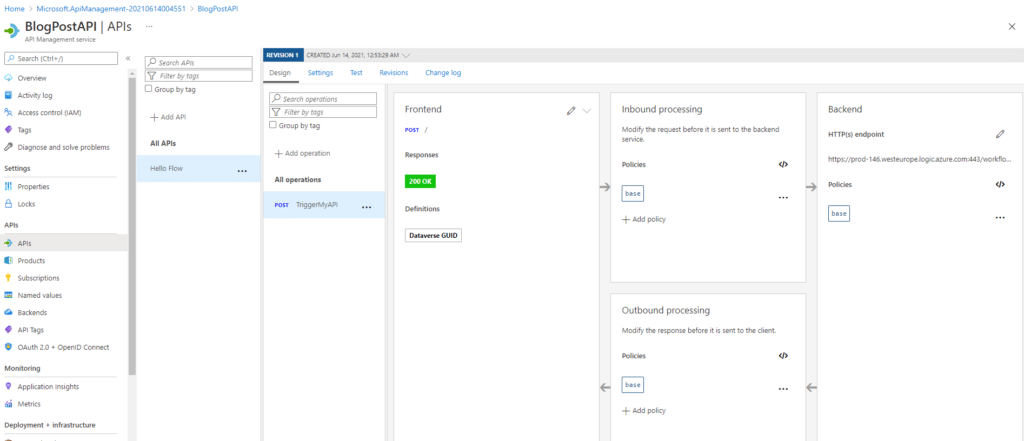
One last step before we can export the API is to go to the Settings tab (see screenshot above) and copy the Base URL.
If we call this base URL with a Dataverse GUID parameter, our previously created flow will be triggered.
How to get the API Key
In the screenshot above you can also see that the checkbox Subscription required is ticked. So in order to call it, we need to have a subscription key.
If you don’t want your users to enter an API key the first time they open the app, I’m afraid there is currently no way to do that EXCEPT you make your API accessible to the public (uncheck Subscription required and jump to the next section Export API to Dataverse for Teams Environment).
To get the API key, in Azure API Management, click on Subscriptions on the left menu.
You should see one entry called Built-in all-access subscription. On the very right side of this entry, you have three dots (…). Click on them and select Show/hide keys.

Copy the Primary key to your clipboard. And NOW we can call this API from, e.g. Postman. Let me show you:

It works, great! Now let’s export our connector to M365, respectively to our Dataverse for Teams environment.
Export API to Dataverse for Teams Environment
In Azure API Management, click on APIs on the left navigation and click on the three dots (…) next to your created API. Click then on Export and select Power Apps and Power Automate on the next screen.

Make sure to select the right Dataverse for Teams environment. If you like, you can also change the name for the custom connector here. Once you’re ready, click on Export.
Create Power Apps and use Custom Connector
The last bit is about bringing it all together in your app. Go ahead and create a new app or use an existing one.
Add your newly created connector as well as your Dataverse table mentioned in the first Create a Flow step.

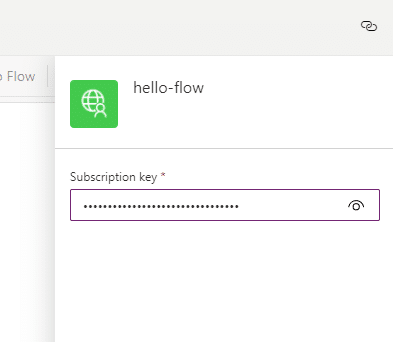
When you added your connector, it will prompt you for the Subscription key. This is the one that you copied to your clipboard earlier. Paste it and click on Connect.
Add a new button to your app and patch a new entry to your table. After the patch, call the connector.
You can do that by going to the OnSelect property and add the following code (adjust accordingly). I’m going to patch to the HelloFlows table and call the HelloFlow connector with the triggermyapi operation like so:
// patch my entry
Set(
    gblCreatedRequest,
    Patch(
        HelloFlows,
        Defaults(HelloFlows),
        {
            Name: "hello1"
        }
    )
);

// start the flow
HelloFlow.triggermyapi({dataverseGuid:gblCreatedRequest.HelloFlow});
Click on the button and see magic 😉. Looking at our flow we can now see that it got triggered two times. Once from Postman, the other time from the button we just clicked:

Conclusion
With Azure API Management you can quickly and easily create, manage and publish APIs from one place. By exporting the APIs to your Dataverse for Teams environment it will create a custom connector that will be free to use for your users. Meaning, no premium licenses are required.