Intro
I recently discovered a new section in the SharePoint Online Admin Center – Content Services. As of today, it includes the modern Term Store and the modern Content type gallery. Two services that have been around in SharePoint forever, but have – until recently – still been classic. Now, they’ve been modernized. Let’s take a look!
What is a Content Type?
Remember that invoice you stored in your document library? Along with your expense reports, proposals, sales reports, and everything else? Ok, maybe you didn’t save them all to the same library, but know that each of those documents could potentially be a different content type if you wanted to.
Each content type can have metadata assigned. Say, your invoice content type has Invoice Date, Total Amount, and Customer as metadata defined. While your Expense Report has Report Date and Total Expense metadata. Now, even if you would have stored all those various documents in the same library (I still hope you didn’t), with content types, you could fill out different fields for each document that you’re uploading. That’s amazing, right? But not only that, but you could also filter down by content type in Search. Say, you’d like to have an overview of all the invoices created in the last 30 days? You could easily achieve that. Just like that.
So, note: Content Types are awesome.
What is the Term Store?
I’m sure you’ve already created a column in a SharePoint list/library. Perhaps this was a Choice column. Let’s say it was Country. Now, what if you need the same choice column on another site collection? Including all the various countries you’ve entered? You certainly don’t want to maintain the same values in two different places, right? Well… You can’t… Columns are either per library or per site collection (hint: Site Columns).
That’s where Term Stores or the “Modern” Term Store come in handy. It’s a centralized terms-library that you can use across all your site collections and lists/libraries. Once entered, you can consume it anywhere.
Not only that, but you can also nest terms. The maximum number of supported levels is 7 (more will impact the performance of the term store!
How to create a Content Type in SharePoint Online
Now to the juicy part. The “new” way of creating Content Types in SharePoint Online – or how it’s now called: “SharePoint in M365” is by going to the SharePoint Admin Center and expand Content services. Below that, you can find Content type gallery.
It already has a much better overview than the classic content type hub, in my opinion. Simply create new content types that will be synced across all your Site Collections by clicking on Create content type on the top left of the page.

From here on, it’s basically the same as in classic. Just type in a Name, a Description and choose the Parent content type. Last but not least, choose the Category (or create a new one while you’re on it) and click on Create.
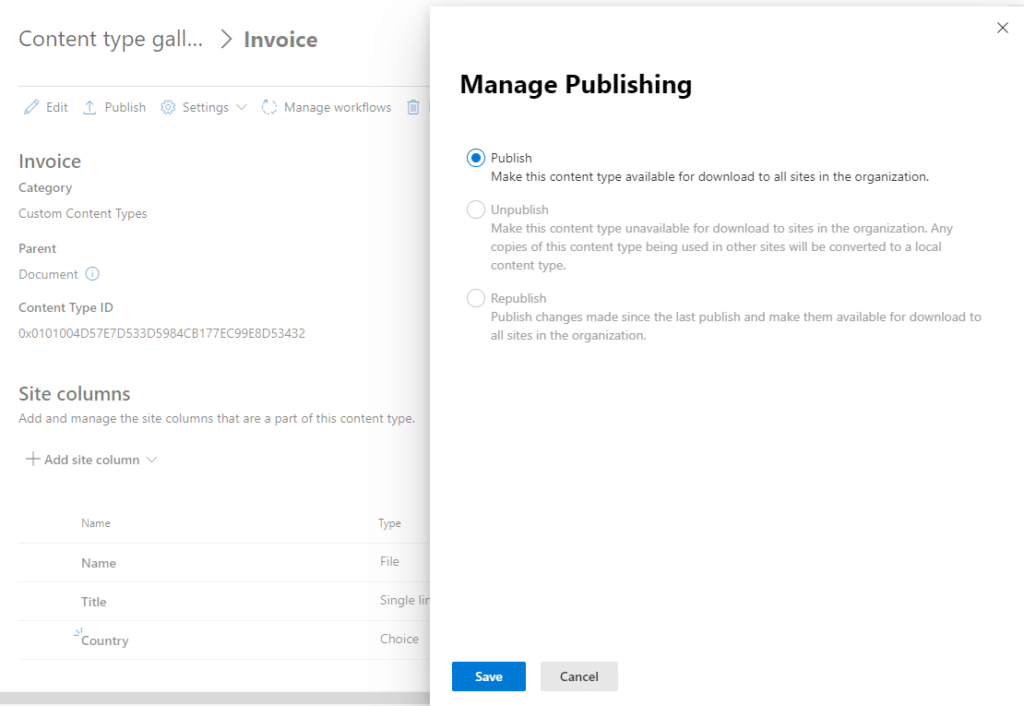
It’s not getting published yet, for that you’d need to click on your newly created Content Type first. Once clicked, make sure to add all the columns that you need (perhaps include that country column that I mentioned above?) and hit on Publish at the top. Select Publish again and click on Save.

Once done, it will start synchronizing your Content-Type, but it still might take a few minutes for it to appear across all your Site Collections.
How to create Term Sets & Terms in SharePoint Online
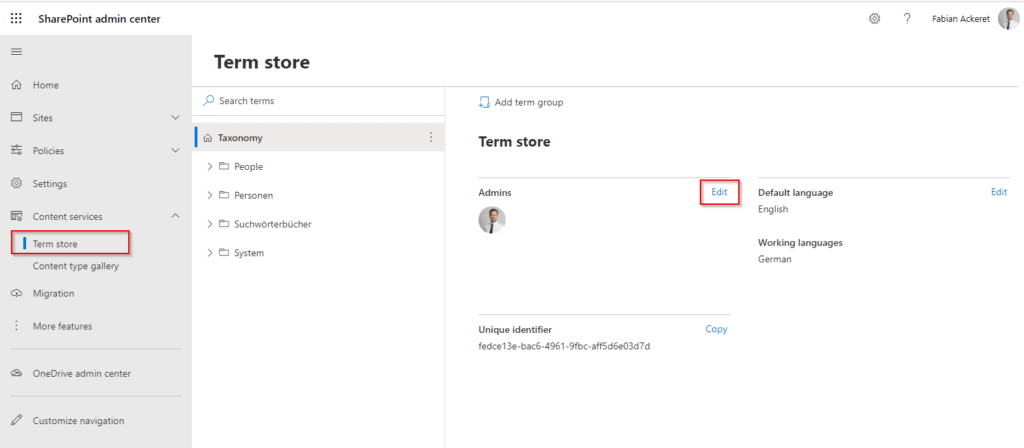
Same as for the Content-Types, go to the SharePoint Admin Center, expand Content services and click on Term store.
To start creating Term Sets and Terms, you will need to add yourself as a Term Store Admin. To do that, right where it says Admins, click on Edit and add yourself.

You can now already start creating term sets or terms under the existing term groups, or create a new term group by selecting Taxonomy first, then Add term group. Give it a name and hit Enter.
Click on your newly created term group and start creating term sets and terms below that. It’s quite self explanatory, but note that once you’ve created a group or a set, you can define non-admins to maintain these for you – if you wanted to. Simply add term group or term set admins on the corresponding levels for them to get the permission.
So you’ve successfully created some terms that you can now use across your SharePoint environment. Even in Content-Types 😉.
The term store offers much more. For example, adding synonyms, allow the terms to be tagged/used (or allow just a certain group to use them), etc.

How to use the Term Store together with Content Types in SharePoint Online?
This part is easy. Once a term has been created, simply go to your Content-Type gallery, click on your Content-Type, click on Add site column, and under Type choose Managed Metadata and select your desired Term.
By the way, if you didn’t wanted to use a custom Content-Type, but rather add the terms directly to your library/list, the column type would also be Managed Metadata, but instead of doing it in the Admin Center, simply do it directly in the list.
Modern Content Types Bonus Tip #1 – Rename Site Columns
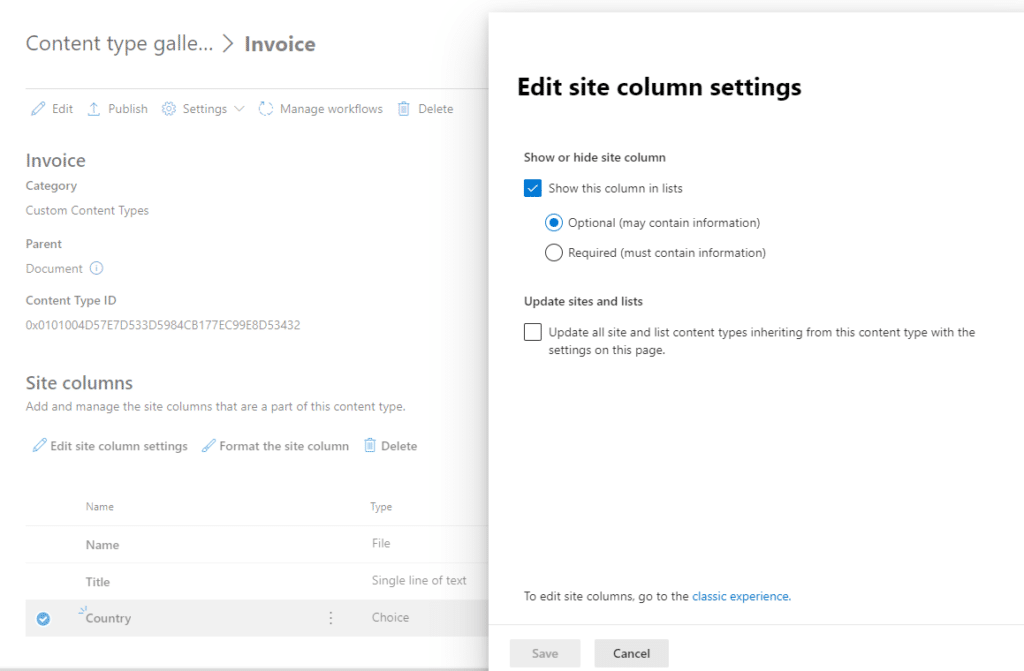
If you would like to rename a Site Column that you’ve created in a Content-Type, you’ll quickly realize there is not (yet) an option for that in the modern experience. To do that, click on the 3 dots next to your column and choose Edit site column settings. After that, at the bottom of the page, click on the Classic experience link. This will bring you to the classic experience, but it allows you to change the column name right there. Once done, scroll to the bottom of the page and click on OK.

Conclusion
The new term store and Content type gallery are awesome. You don’t need to open secret-URLs in your SharePoint environment anymore. Everything became modern and is easily maintainable. Make use of Content-Types whenever possible and also combine them with your terms. It’s especially powerful when using them for columns you might need for every other list or library.
